
When I had to relocate to a new city, one of my biggest concerns was how to pack and transport a motorcycle. Unlike regular household items that can simply be packed into boxes, a bike requires special handling, proper equipment, and careful planning to avoid any damage during transit. Even a small mistake can lead to scratches, dents, or mechanical issues, which makes the entire process a bit stressful if you’re not fully prepared.
After going through the experience myself, I realized that moving a motorcycle isn’t as complicated as it seems as long as you follow the right steps and take necessary precautions. From choosing the right transportation method to securing the bike properly and ensuring all safety measures are in place, every step plays an important role. This hands-on experience helped me understand the process in detail, and I learned exactly how to handle it in a safe, efficient, and hassle-free way.
If you’re wondering how to pack and transport a motorcycle for a move, let me walk you through everything I did so you can avoid costly mistakes and ensure your bike reaches safely.
Step 1: Decide How You Want to Transport the Motorcycle
Table of Contents
The very first decision I had to make was whether to transport my bike myself or hire a professional.
- Self‑transport: If you own a pickup truck or trailer, this option is budget‑friendly. However, you need the right tools and some experience.
- Professional movers: This is what I ultimately chose. Bike‑moving services handle everything from packing to delivery, giving peace of mind.
Tip: Compare quotes from at least 2–3 movers before deciding.
Step 2: Clean the Motorcycle Thoroughly
Before packing my bike, I made sure to give it a thorough wash. This step wasn’t just about making it look clean and presentable—it actually served a very practical purpose. Cleaning the bike helped me clearly spot any existing scratches, dents, or minor issues that might otherwise go unnoticed under dirt and dust. Having a clear view of its condition beforehand gave me a proper baseline.
This way, once the transportation was complete, I could easily compare and identify if any new damage had occurred during the move. It also made the inspection process much smoother and avoided any confusion or disputes, especially if you’re hiring a transport service. In short, a simple wash can save you from bigger headaches later.
- Why it’s important: A clean surface makes inspection easier.
- Extra tip: Take clear photos of the bike from all angles for insurance records.
Step 3: Check for Mechanical Issues
The next thing I did was inspect the bike’s condition. I made sure to:
- Check tire pressure.
- Inspect the brakes and clutch.
- Ensure there were no oil leaks.
- Remove any loose accessories like phone mounts or saddlebags.
This step is crucial because movers usually don’t cover pre‑existing mechanical problems.
Step 4: Drain the Fuel Tank (Partially)
I kept the fuel level at about 1/4th of the tank. Why? Because a full tank adds weight and increases the risk of leakage. On the other hand, leaving it completely empty can make loading and unloading harder.
- Best practice: Keep just enough fuel for minimal movement during loading and unloading.
Step 5: Disconnect the Battery (Optional)
In my case, the transporter required me to disconnect the battery to avoid short circuits. Not all movers ask for this, but if yours does, it’s a simple step.
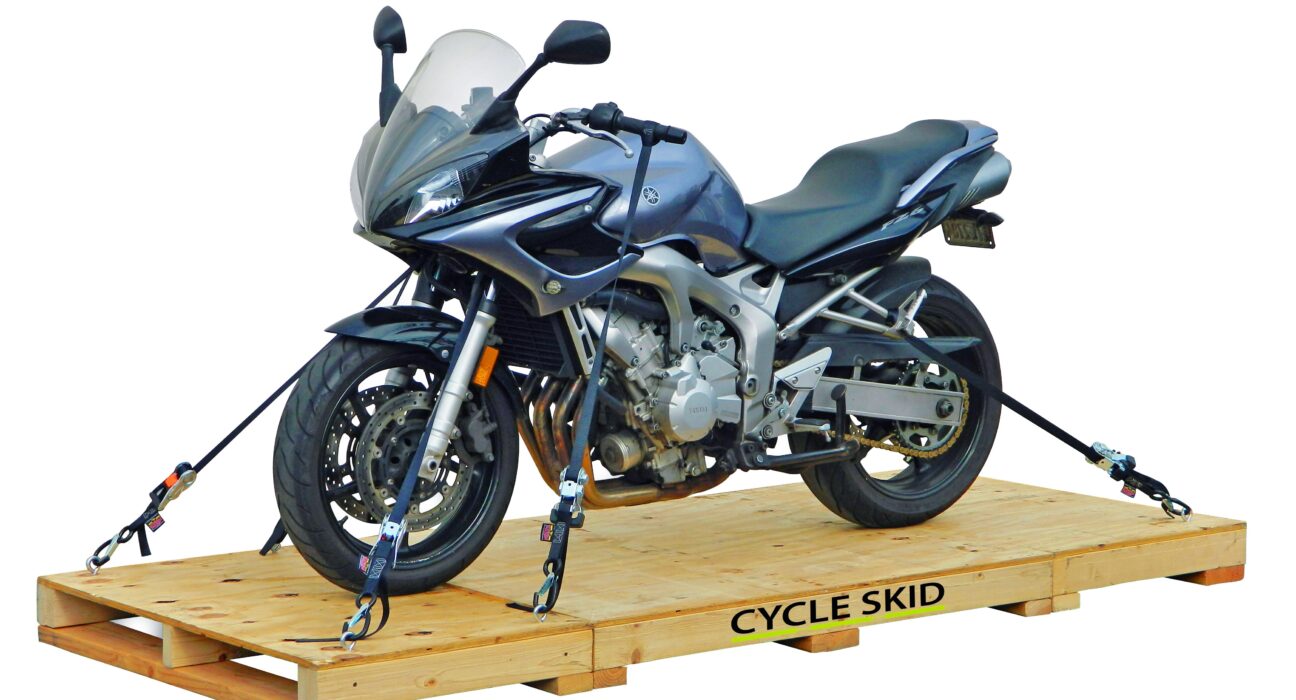
Step 6: Pack the Motorcycle Properly
Here’s how I packed mine:
- Bubble Wrap / Foam Sheets: I used these for mirrors, levers, and fragile parts.
- Blankets or Thick Cloth: To protect the fuel tank and seat from scratches.
- Plastic Sheets: To shield against dust and rain during transit.
- Rope and Straps: To hold everything tightly in place.
Remember: Do not tape directly on the paint; always use a protective layer first.
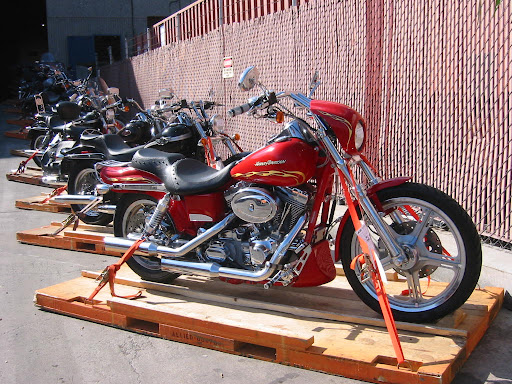
Step 7: Choose the Right Transport Method
I explored three options before deciding:
- Open Truck Transport: Cheapest, but exposes the bike to dust and weather.
- Enclosed Truck Transport: More expensive but fully safe from weather and road debris.
- Crate Shipping: The safest method. The bike is placed in a wooden or metal crate, strapped, and cushioned.
I personally went for enclosed truck transport as it balanced cost and safety.
Step 8: Secure the Motorcycle
Whether you’re transporting your bike yourself or hiring professional movers, securing it properly is absolutely essential to prevent any kind of damage during transit. Start by using high-quality soft straps instead of metal chains or rough ropes, as they help protect the bike’s paint and bodywork from scratches or dents. Make sure to strap the bike down at multiple stable points such as the handlebars, footrests, and the rear section. This multi-point fastening ensures better balance and minimizes movement while the vehicle is in motion.
It’s important to keep the bike in a completely upright position throughout the journey. Any tilt or imbalance can put unnecessary pressure on certain parts of the bike, increasing the risk of damage. Double-check that the straps are tight enough to hold the bike firmly, but not overly tight to avoid stressing the suspension.
Pro Tip: Never rely on the kickstand during transport. It may seem convenient, but if the pressure shifts or the vehicle hits a bump, it can cause serious damage to the bike or even make it fall over.
Step 9: Get Insurance Coverage
One lesson I learned is never to skip insurance. Even with the best movers, accidents can happen. I made sure the moving company offered transit insurance for my motorcycle.
- Check: What damages are covered (scratches, dents, total loss).
- Verify: Whether personal accessories like helmets or saddle bags are included.
Step 10: Inspect Upon Delivery
When my bike arrived, the first thing I did was inspect it thoroughly. I compared it with the photos I had taken earlier. Thankfully, everything was intact. Still, this step is crucial in case you need to file a damage claim.
Final Thoughts
To sum it up, knowing how to pack and transport a motorcycle for a move can save you from stress and unnecessary costs. From choosing the right transport method to packing carefully and checking insurance, each step matters. Personally, I found professional movers to be worth the investment for safety and convenience.
So, if you’re planning a move, follow these steps, and your motorcycle will reach your new home safe and sound—just like mine did!
Safe travels and happy riding!
Also Read: Hunter 350 New Model 2026: Price, New Base Premium Variant, Colours & Full Specs